Quilts and
Pattern Designs
with Carolina Moore

I’m Carolina!
I’m a Quilt Pattern Designer, Award Winning Quilter, and fan of all things quilting. I live in San Diego with my husband, our two boys and our pets.
I love keeping both my hands and mind busy, so I’m always working on lots of projects. You’ll find lots of them shared here!
Latest Projects
-

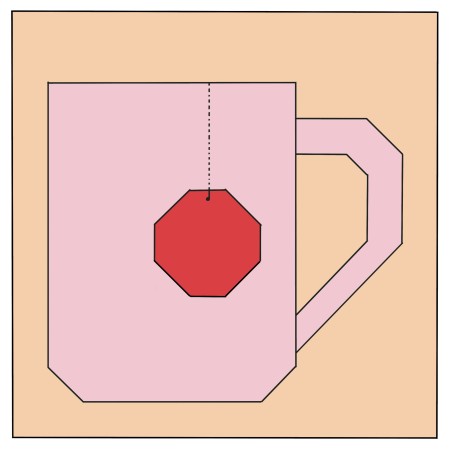
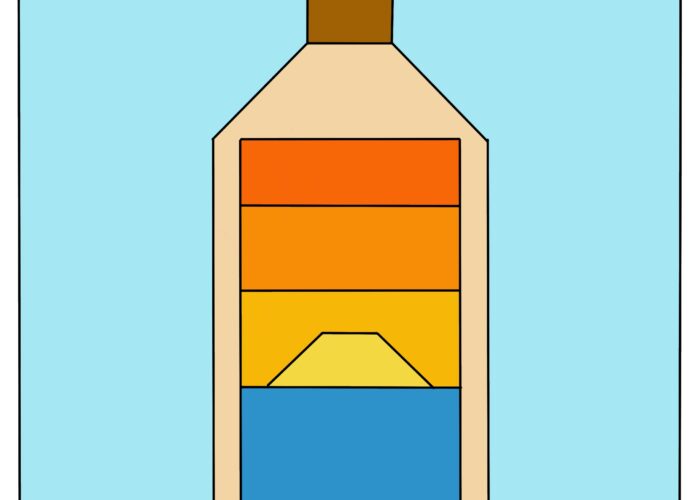
Sun Block Quilt Block – Beach Themed Quilt Block
When I was thinking of what kind of quilt block would be a fun for a beach theme, I thought of Sun
Continue Reading
-

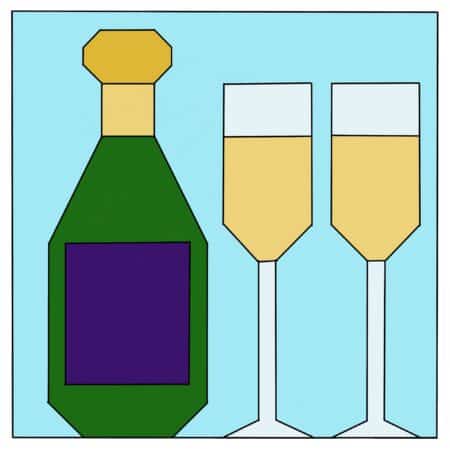
Champagne Quilt Block for Celebrations
This month’s theme is “drinks,” so I designed this fun champagne quilt block, complete with a champagne bottle and two champagne glasses. -
Gear Quilt Block
This fun gear quilt block could also be called a cog quilt block, depending on what you’re looking for. The Gear is -
Free Party Crown Quilt Block
Happy New Year! Our theme for this month is “Party,” so I thought a fun and simple crown block would be the


Let’s Keep In Touch
I’ll let you know about what’s new in quilting, freebies you’ll want to snag, and brighten your inbox about once a week!
[data-ff-el=”root”].ff-6296f1e6fcd62d77ac3e4c4f *,
[data-ff-el=”root”].ff-6296f1e6fcd62d77ac3e4c4f *::before,
[data-ff-el=”root”].ff-6296f1e6fcd62d77ac3e4c4f *::after {
box-sizing: border-box;
}
[data-ff-el=”root”].ff-6296f1e6fcd62d77ac3e4c4f [tabindex=”-1″]:focus {
outline: none !important;
}
[data-ff-el=”root”].ff-6296f1e6fcd62d77ac3e4c4f h1,
[data-ff-el=”root”].ff-6296f1e6fcd62d77ac3e4c4f h2,
[data-ff-el=”root”].ff-6296f1e6fcd62d77ac3e4c4f h3,
[data-ff-el=”root”].ff-6296f1e6fcd62d77ac3e4c4f h4,
[data-ff-el=”root”].ff-6296f1e6fcd62d77ac3e4c4f h5,
[data-ff-el=”root”].ff-6296f1e6fcd62d77ac3e4c4f h6 {
margin-top: 0;
margin-bottom: 0.7em;
}
[data-ff-el=”root”].ff-6296f1e6fcd62d77ac3e4c4f p {
margin-top: 0;
margin-bottom: 1rem;
}
[data-ff-el=”root”].ff-6296f1e6fcd62d77ac3e4c4f ol,
[data-ff-el=”root”].ff-6296f1e6fcd62d77ac3e4c4f ul,
[data-ff-el=”root”].ff-6296f1e6fcd62d77ac3e4c4f dl {
margin-top: 0;
margin-bottom: 1.4rem;
}
[data-ff-el=”root”].ff-6296f1e6fcd62d77ac3e4c4f ol ol,
[data-ff-el=”root”].ff-6296f1e6fcd62d77ac3e4c4f ul ul,
[data-ff-el=”root”].ff-6296f1e6fcd62d77ac3e4c4f ol ul,
[data-ff-el=”root”].ff-6296f1e6fcd62d77ac3e4c4f ul ol {
margin-bottom: 0;
}
[data-ff-el=”root”].ff-6296f1e6fcd62d77ac3e4c4f b,
[data-ff-el=”root”].ff-6296f1e6fcd62d77ac3e4c4f strong {
font-weight: bolder;
}
[data-ff-el=”root”].ff-6296f1e6fcd62d77ac3e4c4f small {
font-size: 80%;
}
[data-ff-el=”root”].ff-6296f1e6fcd62d77ac3e4c4f sub,
[data-ff-el=”root”].ff-6296f1e6fcd62d77ac3e4c4f sup {
position: relative;
font-size: 75%;
line-height: 0;
vertical-align: baseline;
}
[data-ff-el=”root”].ff-6296f1e6fcd62d77ac3e4c4f sub {
bottom: -0.25em;
}
[data-ff-el=”root”].ff-6296f1e6fcd62d77ac3e4c4f sup {
top: -0.5em;
}
[data-ff-el=”root”].ff-6296f1e6fcd62d77ac3e4c4f {
color: #000000;
text-decoration: none;
background-color: transparent;
-webkit-text-decoration-skip: objects;
}
[data-ff-el=”root”].ff-6296f1e6fcd62d77ac3e4c4f a:hover {
color: #4396fd;
text-decoration: none;
}
[data-ff-el=”root”].ff-6296f1e6fcd62d77ac3e4c4f img {
border-style: none;
vertical-align: middle;
}
[data-ff-el=”root”].ff-6296f1e6fcd62d77ac3e4c4f svg:not(:root) {
overflow: hidden;
}
[data-ff-el=”root”].ff-6296f1e6fcd62d77ac3e4c4f,
[data-ff-el=”root”].ff-6296f1e6fcd62d77ac3e4c4f area,
[data-ff-el=”root”].ff-6296f1e6fcd62d77ac3e4c4f button,
[data-ff-el=”root”].ff-6296f1e6fcd62d77ac3e4c4f [role=”button”],
[data-ff-el=”root”].ff-6296f1e6fcd62d77ac3e4c4f input,
[data-ff-el=”root”].ff-6296f1e6fcd62d77ac3e4c4f label,
[data-ff-el=”root”].ff-6296f1e6fcd62d77ac3e4c4f select,
[data-ff-el=”root”].ff-6296f1e6fcd62d77ac3e4c4f summary,
[data-ff-el=”root”].ff-6296f1e6fcd62d77ac3e4c4f textarea {
touch-action: manipulation;
}
[data-ff-el=”root”].ff-6296f1e6fcd62d77ac3e4c4f label {
display: inline-block;
font-weight: bolder;
margin-bottom: 0.7rem;
}
[data-ff-el=”root”].ff-6296f1e6fcd62d77ac3e4c4f button:focus {
outline: 1px dotted;
}
[data-ff-el=”root”].ff-6296f1e6fcd62d77ac3e4c4f input,
[data-ff-el=”root”].ff-6296f1e6fcd62d77ac3e4c4f button,
[data-ff-el=”root”].ff-6296f1e6fcd62d77ac3e4c4f select,
[data-ff-el=”root”].ff-6296f1e6fcd62d77ac3e4c4f optgroup,
[data-ff-el=”root”].ff-6296f1e6fcd62d77ac3e4c4f textarea {
margin: 0;
font-size: inherit;
font-family: inherit;
line-height: inherit;
}
[data-ff-el=”root”].ff-6296f1e6fcd62d77ac3e4c4f button,
[data-ff-el=”root”].ff-6296f1e6fcd62d77ac3e4c4f input {
overflow: visible;
}
[data-ff-el=”root”].ff-6296f1e6fcd62d77ac3e4c4f button,
[data-ff-el=”root”].ff-6296f1e6fcd62d77ac3e4c4f select {
text-transform: none;
}
[data-ff-el=”root”].ff-6296f1e6fcd62d77ac3e4c4f button,
html[data-ff-el=”root”].ff-6296f1e6fcd62d77ac3e4c4f [type=”button”],
[data-ff-el=”root”].ff-6296f1e6fcd62d77ac3e4c4f [type=”reset”],
[data-ff-el=”root”].ff-6296f1e6fcd62d77ac3e4c4f [type=”submit”] {
-webkit-appearance: button;
}
[data-ff-el=”root”].ff-6296f1e6fcd62d77ac3e4c4f button::-moz-focus-inner,
[data-ff-el=”root”].ff-6296f1e6fcd62d77ac3e4c4f [type=”button”]::-moz-focus-inner,
[data-ff-el=”root”].ff-6296f1e6fcd62d77ac3e4c4f [type=”reset”]::-moz-focus-inner,
[data-ff-el=”root”].ff-6296f1e6fcd62d77ac3e4c4f [type=”submit”]::-moz-focus-inner {
padding: 0;
border-style: none;
}
[data-ff-el=”root”].ff-6296f1e6fcd62d77ac3e4c4f input[type=”radio”],
[data-ff-el=”root”].ff-6296f1e6fcd62d77ac3e4c4f input[type=”checkbox”] {
padding: 0;
box-sizing: border-box;
}
[data-ff-el=”root”].ff-6296f1e6fcd62d77ac3e4c4f input[type=”date”],
[data-ff-el=”root”].ff-6296f1e6fcd62d77ac3e4c4f input[type=”time”],
[data-ff-el=”root”].ff-6296f1e6fcd62d77ac3e4c4f input[type=”datetime-local”],
[data-ff-el=”root”].ff-6296f1e6fcd62d77ac3e4c4f input[type=”month”] {
-webkit-appearance: listbox;
}
[data-ff-el=”root”].ff-6296f1e6fcd62d77ac3e4c4f textarea {
resize: vertical;
overflow: auto;
}
[data-ff-el=”root”].ff-6296f1e6fcd62d77ac3e4c4f [type=”number”]::-webkit-inner-spin-button,
[data-ff-el=”root”].ff-6296f1e6fcd62d77ac3e4c4f [type=”number”]::-webkit-outer-spin-button {
height: auto;
}
[data-ff-el=”root”].ff-6296f1e6fcd62d77ac3e4c4f [type=”search”] {
outline-offset: -2px;
-webkit-appearance: none;
}
[data-ff-el=”root”].ff-6296f1e6fcd62d77ac3e4c4f [type=”search”]::-webkit-search-cancel-button,
[data-ff-el=”root”].ff-6296f1e6fcd62d77ac3e4c4f [type=”search”]::-webkit-search-decoration {
-webkit-appearance: none;
}
[data-ff-el=”root”].ff-6296f1e6fcd62d77ac3e4c4f ::-webkit-file-upload-button {
font: inherit;
-webkit-appearance: button;
}
[data-ff-el=”root”].ff-6296f1e6fcd62d77ac3e4c4f [hidden] {
display: none !important;
}
[data-ff-el=”root”].ff-6296f1e6fcd62d77ac3e4c4f .fd-form-control {
width: 100%;
display: block;
outline: none;
position: relative;
-webkit-appearance: none;
}
[data-ff-el=”root”].ff-6296f1e6fcd62d77ac3e4c4f .fd-form-control:focus {
outline: none;
}
[data-ff-el=”root”].ff-6296f1e6fcd62d77ac3e4c4f .fd-form-control::-webkit-input-placeholder {
color: transparent !important;
opacity: 0 !important;
}
[data-ff-el=”root”].ff-6296f1e6fcd62d77ac3e4c4f .fd-form-control::-moz-placeholder {
color: transparent !important;
opacity: 0 !important;
}
[data-ff-el=”root”].ff-6296f1e6fcd62d77ac3e4c4f .fd-form-control:-ms-input-placeholder {
color: transparent !important;
opacity: 0 !important;
}
[data-ff-el=”root”].ff-6296f1e6fcd62d77ac3e4c4f .fd-form-control::placeholder {
color: transparent !important;
opacity: 0 !important;
}
[data-ff-el=”root”].ff-6296f1e6fcd62d77ac3e4c4f .fd-form-label {
top: 0;
left: 0;
right: 0;
margin: 0;
overflow: hidden;
position: absolute;
white-space: nowrap;
text-overflow: ellipsis;
pointer-events: none;
}
[data-ff-el=”root”].ff-6296f1e6fcd62d77ac3e4c4f .fd-form-control:not(:-moz-placeholder-shown)+.fd-form-label {
opacity: 0;
}
[data-ff-el=”root”].ff-6296f1e6fcd62d77ac3e4c4f .fd-form-control:not(:-ms-input-placeholder)+.fd-form-label {
opacity: 0;
}
[data-ff-el=”root”].ff-6296f1e6fcd62d77ac3e4c4f .fd-form-control:not(:placeholder-shown)+.fd-form-label {
opacity: 0;
}
[data-ff-el=”root”].ff-6296f1e6fcd62d77ac3e4c4f .fd-form-description {
margin: 5px 0 0 0;
font-size: 0.8em;
}
[data-ff-el=”root”].ff-6296f1e6fcd62d77ac3e4c4f .fd-form-feedback {
margin: 5px 0 0 0;
font-size: 0.8em;
}
[data-ff-el=”root”].ff-6296f1e6fcd62d77ac3e4c4f .fd-form-group {
margin: 0 0 15px;
position: relative;
}
[data-ff-el=”root”].ff-6296f1e6fcd62d77ac3e4c4f .fd-form-group.fd-has-success .fd-form-feedback,
[data-ff-el=”root”].ff-6296f1e6fcd62d77ac3e4c4f .fd-form-group.fd-has-success .fd-form-check {
color: #02dba8 !important;
}
[data-ff-el=”root”].ff-6296f1e6fcd62d77ac3e4c4f .fd-form-group.fd-has-success .fd-form-control {
color: #02dba8 !important;
border-color: #02dba8 !important;
}
[data-ff-el=”root”].ff-6296f1e6fcd62d77ac3e4c4f .fd-form-group.fd-has-success .fd-form-feedback {
display: block;
}
[data-ff-el=”root”].ff-6296f1e6fcd62d77ac3e4c4f .fd-form-group.fd-has-error .fd-form-feedback,
[data-ff-el=”root”].ff-6296f1e6fcd62d77ac3e4c4f .fd-form-group.fd-has-error .fd-form-check {
color: #eb3d3b !important;
}
[data-ff-el=”root”].ff-6296f1e6fcd62d77ac3e4c4f .fd-form-group.fd-has-error .fd-form-control {
color: #eb3d3b !important;
border-color: #eb3d3b !important;
}
[data-ff-el=”root”].ff-6296f1e6fcd62d77ac3e4c4f .fd-form-group.fd-has-error .fd-form-feedback {
display: block;
}
[data-ff-el=”root”].ff-6296f1e6fcd62d77ac3e4c4f .fd-btn {
cursor: pointer;
display: -webkit-inline-box;
display: inline-flex;
outline: none;
max-width: 100%;
font-style: normal;
text-align: center;
-webkit-box-align: center;
align-items: center;
text-shadow: none;
white-space: normal;
-webkit-box-pack: center;
justify-content: center;
text-decoration: none;
}
[data-ff-el=”root”].ff-6296f1e6fcd62d77ac3e4c4f .fd-btn:hover {
outline: none;
}
[data-ff-el=”root”].ff-6296f1e6fcd62d77ac3e4c4f .fd-btn:focus {
outline: none;
}
[data-ff-el=”root”].ff-6296f1e6fcd62d77ac3e4c4f .fd-btn:disabled {
opacity: 0.8;
}
[data-ff-el=”root”].ff-6296f1e6fcd62d77ac3e4c4f .fd-form-check {
cursor: pointer;
margin: 0;
display: -webkit-box;
display: flex;
position: relative;
-webkit-box-align: center;
align-items: center;
padding-left: 30px;
}
[data-ff-el=”root”].ff-6296f1e6fcd62d77ac3e4c4f .fd-form-check__input {
top: 0;
left: 0;
width: 18px;
height: 18px;
opacity: 0;
z-index: -1;
position: absolute;
}
[data-ff-el=”root”].ff-6296f1e6fcd62d77ac3e4c4f .fd-form-check__checkmark {
top: 0;
left: 0;
width: 18px;
border: 1px solid #c4c4c4;
height: 18px;
display: block;
position: absolute;
background: #ffffff;
}
[data-ff-el=”root”].ff-6296f1e6fcd62d77ac3e4c4f .fd-form-check__label {
margin: 0;
font-size: 14px;
text-align: left;
word-break: break-word;
font-weight: 400;
line-height: 18px;
letter-spacing: 0.01em;
}
[data-ff-el=”root”].ff-6296f1e6fcd62d77ac3e4c4f .fd-form-check__input:checked+.fd-form-check__checkmark::after {
opacity: 1;
z-index: 1;
visibility: visible;
}
[data-ff-el=”root”].ff-6296f1e6fcd62d77ac3e4c4f .fd-form-check__checkmark::after {
top: -1px;
left: -1px;
width: 18px;
height: 18px;
content: “”;
display: block;
opacity: 0;
z-index: -1;
position: absolute;
-webkit-transition: opacity 0.4s, z-index 0.4s;
transition: opacity 0.4s, z-index 0.4s;
visibility: inherit;
background-size: 12px;
background-image: url(“data:image/svg+xml,%3csvg xmlns=’https://www.w3.org/2000/svg’ fill=’black’ width=’12’ height=’10’ viewBox=’0 0 11.51 8.2’%3e%3ctitle%3echeck%3c/title%3e%3cpath d=’M4.05%2c8.2A.74.74%2c0%2c0%2c1%2c3.52%2c8L.22%2c4.68A.75.75%2c0%2c0%2c1%2c1.28%2c3.62l3.3%2c3.3A.75.75%2c0%2c0%2c1%2c4.58%2c8%2c.74.74%2c0%2c0%2c1%2c4.05%2c8.2Z’/%3e%3cpath d=’M4.06%2c8.2A.74.74%2c0%2c0%2c1%2c3.53%2c8a.75.75%2c0%2c0%2c1%2c0-1.06l6.7-6.7a.75.75%2c0%2c0%2c1%2c1.06%2c1.06L4.59%2c8A.74.74%2c0%2c0%2c1%2c4.06%2c8.2Z’/%3e%3c/svg%3e”);
background-repeat: no-repeat;
background-position: center center;
}
[data-ff-el=”root”].ff-6296f1e6fcd62d77ac3e4c4f .fd-form-check__input:focus {
outline: none;
}
[data-ff-el=”root”].ff-6296f1e6fcd62d77ac3e4c4f .fd-form-content {
position: relative;
}
[data-ff-el=”root”].ff-6296f1e6fcd62d77ac3e4c4f .fd-has-success .fd-form-content {
display: none;
}
[data-ff-el=”root”].ff-6296f1e6fcd62d77ac3e4c4f .fd-has-captcha .fd-form-content>*:not(.fd-form-captcha) {
opacity: 0;
visibility: hidden;
}
[data-ff-el=”root”].ff-6296f1e6fcd62d77ac3e4c4f .fd-form-captcha {
top: 0;
left: 0;
width: 100%;
height: 100%;
display: -webkit-box;
display: flex;
position: absolute;
-webkit-box-align: center;
align-items: center;
-webkit-box-pack: start;
justify-content: flex-start;
}
[data-ff-el=”root”].ff-6296f1e6fcd62d77ac3e4c4f .fd-form-success {
display: none;
}
[data-ff-el=”root”].ff-6296f1e6fcd62d77ac3e4c4f .fd-has-success .fd-form-success {
display: block;
}
[data-ff-el=”root”].ff-6296f1e6fcd62d77ac3e4c4f .fd-form-success>*:last-child {
margin-bottom: 0;
}
[data-ff-el=”root”].ff-6296f1e6fcd62d77ac3e4c4f .fd-form-error {
display: none;
}
[data-ff-el=”root”].ff-6296f1e6fcd62d77ac3e4c4f .fd-has-error .fd-form-error {
display: block;
}
[data-ff-el=”root”].ff-6296f1e6fcd62d77ac3e4c4f .fd-form-error>*:last-child {
margin-bottom: 0;
}
[data-ff-el=”root”].ff-6296f1e6fcd62d77ac3e4c4f .fd-focus-visible,
[data-ff-el=”root”].ff-6296f1e6fcd62d77ac3e4c4f .fd-form-check__input.fd-focus-visible+.fd-form-check__checkmark {
outline: none;
box-shadow: 0 0 0 2px #fff, 0 0 0 6px #000 !important;
-webkit-transition: box-shadow 0.2s !important;
transition: box-shadow 0.2s !important;
}
[data-ff-el=”root”].ff-6296f1e6fcd62d77ac3e4c4f .fd-focus-visible,
[data-ff-el=”root”].ff-6296f1e6fcd62d77ac3e4c4f .fd-form-check__input.fd-focus-visible+.fd-form-check__checkmark {
outline: none;
box-shadow: 0 0 0 2px #ffffff, 0 0 0 6px #000 !important;
-webkit-transition: box-shadow 0.2s !important;
transition: box-shadow 0.2s !important;
}
[data-ff-el=”root”].ff-6296f1e6fcd62d77ac3e4c4f .ff-6296f1e6fcd62d77ac3e4c4f__container {
margin: 0 auto;
max-width: 1170px;
}
[data-ff-el=”root”].ff-6296f1e6fcd62d77ac3e4c4f .ff-6296f1e6fcd62d77ac3e4c4f__form {
color: #333333;
width: 100%;
margin: 0 auto;
padding: 0px;
font-size: 16px;
text-align: center;
font-family: Helvetica, sans-serif;
font-weight: 300;
line-height: 1.6;
letter-spacing: 0.1px;
text-transform: none;
}
@media (max-width: 767px) {
[data-ff-el=”root”].ff-6296f1e6fcd62d77ac3e4c4f .ff-6296f1e6fcd62d77ac3e4c4f__form {
word-wrap: anywhere;
word-break: break-word;
white-space: normal;
overflow-wrap: break-word;
}
}
[data-ff-el=”root”].ff-6296f1e6fcd62d77ac3e4c4f .ff-6296f1e6fcd62d77ac3e4c4f__content {
margin: -10px -5px 0;
display: -webkit-box;
display: flex;
flex-wrap: wrap;
-webkit-box-align: start;
align-items: start;
-webkit-box-orient: horizontal;
-webkit-box-direction: normal;
flex-direction: row;
-webkit-box-pack: center;
justify-content: center;
}
@media (max-width: 767px) {
[data-ff-el=”root”].ff-6296f1e6fcd62d77ac3e4c4f .ff-6296f1e6fcd62d77ac3e4c4f__content {
display: block;
}
}
[data-ff-el=”root”].ff-6296f1e6fcd62d77ac3e4c4f .ff-6296f1e6fcd62d77ac3e4c4f__fields {
-webkit-box-flex: 0;
flex: 0 1 auto;
margin: 0px 0px 0;
display: -webkit-box;
display: flex;
flex-wrap: wrap;
max-width: -webkit-calc(100% + 10px);
max-width: calc(100% + 10px);
-webkit-box-pack: center;
justify-content: center;
}
@media (max-width: 767px) {
[data-ff-el=”root”].ff-6296f1e6fcd62d77ac3e4c4f .ff-6296f1e6fcd62d77ac3e4c4f__fields {
display: block;
}
}
[data-ff-el=”root”].ff-6296f1e6fcd62d77ac3e4c4f .ff-6296f1e6fcd62d77ac3e4c4f__field {
-webkit-box-flex: 1;
flex: 1 1;
margin: 10px 5px 0;
font-size: 13px;
max-width: 250px;
min-width: 140px;
text-align: left;
font-family: Helvetica, sans-serif;
font-weight: 400;
letter-spacing: 0.1px;
}
@media (max-width: 767px) {
[data-ff-el=”root”].ff-6296f1e6fcd62d77ac3e4c4f .ff-6296f1e6fcd62d77ac3e4c4f__field {
max-width: -webkit-calc(100% – 10px);
max-width: calc(100% – 10px);
}
}
[data-ff-el=”root”].ff-6296f1e6fcd62d77ac3e4c4f .ff-6296f1e6fcd62d77ac3e4c4f__control {
color: #000000;
border: 1px solid #dddddd;
height: 46px;
padding: 12px 20px;
font-size: 13px;
background: transparent;
text-align: left;
font-family: Helvetica, sans-serif;
font-weight: 400;
line-height: 20px;
border-radius: 0px;
letter-spacing: 0.1px;
text-transform: none;
}
[data-ff-el=”root”].ff-6296f1e6fcd62d77ac3e4c4f .ff-6296f1e6fcd62d77ac3e4c4f__label {
color: #fff;
border: 1px solid transparent;
padding: 12px 20px;
font-size: 13px;
text-align: left;
font-family: Helvetica, sans-serif;
font-weight: 400;
line-height: 20px;
letter-spacing: 0.1px;
text-transform: none;
}
.modal-content .newsletter [data-ff-el=”root”].ff-6296f1e6fcd62d77ac3e4c4f .ff-6296f1e6fcd62d77ac3e4c4f__label{
color: #242424;
}
[data-ff-el=”root”].ff-6296f1e6fcd62d77ac3e4c4f .ff-6296f1e6fcd62d77ac3e4c4f__preference {
margin: 30px 5px 0;
display: -webkit-box;
display: flex;
-webkit-box-orient: vertical;
-webkit-box-direction: normal;
flex-direction: column;
}
[data-ff-el=”root”].ff-6296f1e6fcd62d77ac3e4c4f .ff-6296f1e6fcd62d77ac3e4c4f__preference-title {
color: #333333;
width: 100%;
margin: 0 0 30px;
display: block;
font-size: 18px;
text-align: center;
font-family: Helvetica, sans-serif;
font-weight: 700;
line-height: 1.4;
letter-spacing: 0px;
text-transform: none;
}
[data-ff-el=”root”].ff-6296f1e6fcd62d77ac3e4c4f .ff-6296f1e6fcd62d77ac3e4c4f__preference-title * {
line-height: inherit;
}
[data-ff-el=”root”].ff-6296f1e6fcd62d77ac3e4c4f .ff-6296f1e6fcd62d77ac3e4c4f__preference-control {
width: 100%;
}
[data-ff-el=”root”].ff-6296f1e6fcd62d77ac3e4c4f .ff-6296f1e6fcd62d77ac3e4c4f__preference-list {
width: -webkit-calc(100% + 24px);
width: calc(100% + 24px);
margin: -8px -12px;
display: -webkit-box;
display: flex;
flex-wrap: wrap;
-webkit-box-pack: start;
justify-content: flex-start;
}
@media (max-width: 767px) {
[data-ff-el=”root”].ff-6296f1e6fcd62d77ac3e4c4f .ff-6296f1e6fcd62d77ac3e4c4f__preference-list {
display: block;
}
}
[data-ff-el=”root”].ff-6296f1e6fcd62d77ac3e4c4f .ff-6296f1e6fcd62d77ac3e4c4f__preference-item {
-webkit-box-flex: 0;
flex: 0 0 33.333333333333336%;
padding: 8px 12px;
}
[data-ff-el=”root”].ff-6296f1e6fcd62d77ac3e4c4f .ff-6296f1e6fcd62d77ac3e4c4f__form-check .fd-form-check__input {
top: 2.200000000000001px;
}
[data-ff-el=”root”].ff-6296f1e6fcd62d77ac3e4c4f .ff-6296f1e6fcd62d77ac3e4c4f__form-check .fd-form-check__checkmark {
top: 2.200000000000001px;
border-radius: 3px;
}
[data-ff-el=”root”].ff-6296f1e6fcd62d77ac3e4c4f .ff-6296f1e6fcd62d77ac3e4c4f__form-check .fd-form-check__label {
color: #333333;
font-size: 14px;
min-height: 22.400000000000002px;
font-family: Helvetica, sans-serif;
font-weight: 400;
line-height: 1.6;
letter-spacing: 0px;
text-transform: none;
}
[data-ff-el=”root”].ff-6296f1e6fcd62d77ac3e4c4f .ff-6296f1e6fcd62d77ac3e4c4f__form-check .fd-form-check__checkmark::after {
background-size: 12px;
background-image: url(“data:image/svg+xml,%3csvg xmlns=’https://www.w3.org/2000/svg’ fill=’black’ width=’12’ height=’10’ viewBox=’0 0 11.51 8.2’%3e%3ctitle%3echeck%3c/title%3e%3cpath d=’M4.05%2c8.2A.74.74%2c0%2c0%2c1%2c3.52%2c8L.22%2c4.68A.75.75%2c0%2c0%2c1%2c1.28%2c3.62l3.3%2c3.3A.75.75%2c0%2c0%2c1%2c4.58%2c8%2c.74.74%2c0%2c0%2c1%2c4.05%2c8.2Z’/%3e%3cpath d=’M4.06%2c8.2A.74.74%2c0%2c0%2c1%2c3.53%2c8a.75.75%2c0%2c0%2c1%2c0-1.06l6.7-6.7a.75.75%2c0%2c0%2c1%2c1.06%2c1.06L4.59%2c8A.74.74%2c0%2c0%2c1%2c4.06%2c8.2Z’/%3e%3c/svg%3e”);
}
[data-ff-el=”root”].ff-6296f1e6fcd62d77ac3e4c4f .ff-6296f1e6fcd62d77ac3e4c4f__footer {
-webkit-box-flex: 0;
flex: 0 1 auto;
margin-top: 10px;
text-align: center;
margin-left: 5px;
margin-right: 5px;
}
.modal-content .newsletter [data-ff-el=”root”].ff-6296f1e6fcd62d77ac3e4c4f .ff-6296f1e6fcd62d77ac3e4c4f__footer{
flex: 1;
margin: 10px auto 0;
}
.sidebar-newsletter [data-ff-el=”root”].ff-6296f1e6fcd62d77ac3e4c4f .ff-6296f1e6fcd62d77ac3e4c4f__footer{
flex: 1;
margin: 0 auto;
}
@media (max-width: 767px) {
[data-ff-el=”root”].ff-6296f1e6fcd62d77ac3e4c4f .ff-6296f1e6fcd62d77ac3e4c4f__footer {
margin-top: 25px;
}
}
[data-ff-el=”root”].ff-6296f1e6fcd62d77ac3e4c4f .ff-6296f1e6fcd62d77ac3e4c4f__button {
color: #ffffff;
border: 1px solid #bd3174;
display: inline-block;
padding: 12px 20px;
font-size: 13px;
font-weight: 700;
background: #bd3174;
text-align: center;
font-family: Helvetica, sans-serif;
line-height: 20px;
white-space: nowrap;
border-radius: 0px;
letter-spacing: 0.1px;
text-transform: none;
}
.sidebar-newsletter [data-ff-el=”root”].ff-6296f1e6fcd62d77ac3e4c4f .ff-6296f1e6fcd62d77ac3e4c4f__button{
background: #057C6E;
border: 1px solid #057C6E;
}
[data-ff-el=”root”].ff-6296f1e6fcd62d77ac3e4c4f .ff-6296f1e6fcd62d77ac3e4c4f__error {
margin: 10px 0 0 0;
}
(function(w, d, t, h, s, n) {
w.FlodeskObject = n;
var fn = function() {
(w[n].q = w[n].q || []).push(arguments);
};
w[n] = w[n] || fn;
var f = d.getElementsByTagName(t)[0];
var v = ‘?v=’ + Math.floor(new Date().getTime() / (120 * 1000)) * 60;
var sm = d.createElement(t);
sm.async = true;
sm.type = ‘module’;
sm.src = h + s + ‘.mjs’ + v;
f.parentNode.insertBefore(sm, f);
var sn = d.createElement(t);
sn.async = true;
sn.noModule = true;
sn.src = h + s + ‘.js’ + v;
f.parentNode.insertBefore(sn, f);
})(window, document, ‘script’, ‘https://assets.flodesk.com’, ‘/universal’, ‘fd’);
window.fd(‘form:handle’, {
formId: ‘6296f1e6fcd62d77ac3e4c4f’,
rootEl: ‘.ff-6296f1e6fcd62d77ac3e4c4f’,
});
Thank you for subscribing!

Join Me On Youtube
I can’t wait to craft with you… be sure to subscribe to get all my latest videos!